Internal Spreadsheets Tutorial
Internal Spread Sheets can be used to change values in your simulation without editing the simulation model itself.
Overview
This guide builds up the following example.
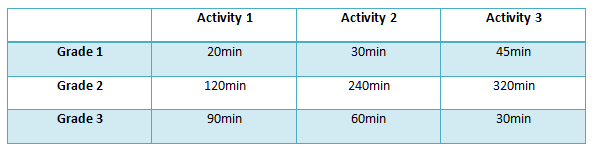
We have 3 different activities and 3 different product grades. Each grade takes a different amount of time to process within each activity. The following steps show you how to set up your simulation so that these values are read in from one of Simul8’s internal spreadsheets.
Step One: Create a 4-click and spreadsheet
First of all we need to create a 4-click simulation model.
To create a spreadsheet, go to the Information Store dropdown, and select the Spreadsheet option;

You can now give your spreadsheet a name, using the dialog shown below.

Using the naming convention ‘ss_xxx’ will make it easy to identify your spreadsheet later on. This spreadsheet will be used to hold timing information, so ‘ss_timing’ is an appropriate name.
Your spreadsheet is now accessible from the ‘Spreadsheets’ menu on the Data & Rules tab.

Open your spreadsheet, and enter the values for each Activity and Product Type. We will look at how to reference these values shortly. Your spreadsheet should look like this.

Step Two: Link the Activity’s timing to the spreadsheet
It is possible to change the timing of an Activity so that it references a particular cell in a spreadsheet.
In order to set this up, we use the Formula Editor. Select the Activity and then use the button with 3 small dots, as below:

This opens the Formula Editor, where you can find your spreadsheet we just created.

Double click on the name of your spreadsheet to add it to the text box as above and open a preview of the spreadsheet to the right. There is also a cell reference here, which is where you can tell your simulation which cell in the spreadsheet to look at for this activity’s timing information.
This is Activity 1, and we are only going to consider Product Type 1 at the moment, so we reference cell [1,1].
It is worth noting at this point that, as default, Simul8 uses the convention [c,r], In the Formula Editor you have the option to switch to [r,c].
Choose cell [1,1] and click OK.
Your activity timing box should now look like this.

Whenever a work item enters the Activity, your simulation will reference the appropriate cell of ss_timing to get the timing information.
Step Three: Add more Activities
The next step is to add some more activities to your simulation model; expand your 4-click so that there are 2 more activities.

Now we can modify their timings so that they also read the relevant cell within ss_timing.
Pick Activity 2 and set its timing to ss_timing[2,1]. Do the same with Activity 3, and reference ss_timing[3,1].
We now have a simulation model where Product Type 1 takes a different amount of time in each activity, based on the values in our spreadsheet. The next step is to add the other 2 product types.
Step Four: Add more complexity; 2 more product types
We can now add the two other product types and vary the amount of time they take in each activity, based on the values in our spreadsheet.
First, create a new label (lbl_grade) See this Labels Tutorial for more information on how to do this.
Attach lbl_grade in your Start point and set it so that all 3 values are equally likely (Uniform Distribution, between 1 and 3). You could also use a Probability Profile at this point if you know the % of each product type.

If we look back at our spreadsheet, we can see how the data is laid out.
We now want to vary the row we look at based on lbl_grade.
Instead of always referring to row 1, we want to look at rows 2 or 3 if our lbl_grade is 2 or 3.
Change your cell reference for Activity 1 to ss_timing[1,lbl_grade]. This means that we look at column 1, but the row we look at depends on lbl_grade. We can do the same for Activities 2 and 3, so that they look at ss_timing[2,lbl_grade] and ss_timing[3,lbl_grade] respectively.
Step Five: Test your simulation
In order to ensure our simulation is working as expected, it is important to test the way it behaves.
Use the Step control to view your simulation model event by event. When a work item arrives at Activity 1, check it’s label value using the ‘Current Contents’ button on the Properties tab.

This will give you the label value for the selected work item. Work out how long you would expect that work item to take in Activity 1 (this will be either 20, 120 or 90 minutes depending on label value). You can then step forward to see when the work item leaves and see if this corresponds to the timing you would expect for that label value.