Labels Tutorial
We use Labels to attach a value or attribute to a Work Item.
At the moment, all the Work Items traveling through our simulation are the same, i.e. they have no distinguishing attributes.

We want to distinguish between different types of Work Item, for example by marking each one as either Green or a Blue Car type.

Overview
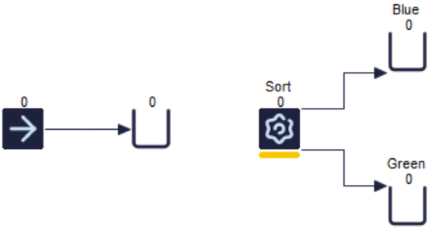
We are going to use the structure below in order to create a simple example using Label.

We will assign a value to each Work Item, telling us whether it is Blue or Green. We can then use this information to send the Blue Work Items to the ‘Blue’ Queue, and the Green Work Items to the ‘Green’ Queue.
Step One: Create a Label
First of all we need to create a new Label.
 Clicking on the Labels button on the Data and Rules tab takes you to the Central Label Editor which is a list of all the Label in your simulation. This will be blank if you have not previously created any Label.

Select ‘Add Label’ to create a new Label.
First, you need to enter a name for the Label Call your Label lbl_color. Please note that only one Label is needed for distinguishing Work Items based on color, rather than one for Blue and Green Cars each. We now need to choose whether to create a number or text type Label. Number type Label are more versatile because they can be used for mathematical functions later on, so it's generally a good idea to pick a number style Label as a default.
*Quick Tip: When naming Labels and other variables in Simul8, it is useful to assign a prefix to the name, so their type can be easily recognizable! In the case of Labels, the prefix “lbl” is usually used.
At this point you can also add a memo to your Label. A memo won’t alter your Label in any way. It is used just to remind you of what the different Label values represent. We are going to give our lbl_color two different values depending on whether a Work Item is Blue or Green. Adding something like this to your memo box should remind you of what your values represent.

At this point we have created our Label, but not attached it anywhere in our simulation. This will be the next step.
Step Two: Attach your Label
Labels can be attached in Start Points, Activities, and in Start Up in Queues. As a general rule, you should attach a Label as soon as you know the relevant information. In our Car example, we could attach the Label in either the Start or Activity, and the outcome would be the same. In larger simulations, however, it is important to think about where you might need to reference particular information. If you attach a Label as soon as you know the information it contains, it will be there wherever you need it in your simulation.
We will attach lbl_color in the Start Point in this example. To do this, click the “Add Object” button in the Central Label Editor and choose Start Point 1.

When this is done, you need to choose what action you would like your Label to take; this can be done by clicking the “Add Action” button. Choose one of the Action options on the right hand side of this dialog so that you can tell your simulation what to do with the Label. Your Actions dialog should currently look like this.

The option Add a Label to change allows you to pick the Label you want to add actions to or remove from here. To remove click the Label, and then choose Remove Selected.
You can also attach a Label to an object by selecting the object in your simulation, and then choose Actions on the ribbon under the Properties tab.

Step Three: Set the value of your Label
In this example we are going to say that each Work Item is equally likely to be a Blue or Green. We can set up our simulation to reflect this, so that the Label value is equally likely to be 1 or 2.

The mathematical equivalent of this likelihood is a Rounded Uniform Distribution with a Lower Bound of 1 and an Upper Bound of 2. This means that any value is equally likely to occur between the lower and upper bound, and only whole numbers can occur.
Effectively, we are saying that 1 and 2 are the only possible values, and each of these values are equally likely.
Step Four: Testing
Now that we have attached our Label and set its value, we can test whether the Label values are being correctly assigned to our Work Items.
In your structure, delete the routing arrow after the 1st Queue so that it looks like this.
We can now run the simulation so that all Work Items remain in the first Queue. It is now possible to inspect all the Label values of Work Items in this Queue to check that we have a mix of male and females (values 1 and 2).
![]() To check the contents of a Queue, first of all select the Queue, then go to its Properties tab, and choose Current Contents. You can now scroll through each Work Item and see its value for lbl_color. You should have a mixture of values 1 and 2.
To check the contents of a Queue, first of all select the Queue, then go to its Properties tab, and choose Current Contents. You can now scroll through each Work Item and see its value for lbl_color. You should have a mixture of values 1 and 2.

You can now replace the routing arrow to link your simulation back together.
Step Five: Routing Out
The final stage is to control sending the right Work Items to the right Queues. We can do this using Routing Out in the Activity.
![]() Select your Activity, then Routing Out on the ribbon. We are going to Route Out using the Label discipline because it is the Label value which determines where the Work Items should go.
Select your Activity, then Routing Out on the ribbon. We are going to Route Out using the Label discipline because it is the Label value which determines where the Work Items should go.
When you choose Label as your Routing out discipline, a dialog will open with a list of all the Label in your simulation.
Whichever Queue you have first in the list order will take Label value 1 by default, and whichever Queue you have second in the list order will take Label value 2, and so on. If these are the wrong way round, the pointer arrows can be used to change the ordering.

Make sure that Label value 1 is being routed to the Blue Queue and value 2 is being routed to the Green Queue, by checking the contents of each Queue in turn, the way we did above.
Using Labels in Simul8 can be useful not only for Routing Out but also for many other actions in Simul8.