Vehicles
All Vehicles belong to a Vehicle class that defines its characteristics and the path network that the Vehicle can travel.

Enter the Vehicle Class dialog via the View by Type menu on the Build tab. (Also by clicking on a Vehicle in the class - in this case the Contents button will be available if the Vehicle is currently carrying any Work Items).
Vehicle capacity defines the number of Work Items the Vehicle can carry at any one time (See also Loaders Min and Max Load Quantity).
Speed defines how fast it will travel along paths (to make Vehicles travel slower along some paths use the path dialog).
Width defines the Vehicles ability to pass other Vehicles on the same path ( the width of the path). If Vehicles are too wide to pass Simul8 will check the parameters in the path dialog (prevent passing) to decide how to proceed.
The Path Network option selects the network that the Vehicle class operates.
The Parking Point defines a base location that the Vehicles should return to if it has no other work to do. (The Vehicle will have work to do if there are Loaders waiting for work to be transported and the Vehicle is allowed to carry that work).
Valid Work Types can be restricted by selecting a Label that will define the work type and then entering values that are OK to carry. For example, you might have a Label “Job” with values 1, 2 and 3. If your Vehicle can carry Job types 1 and 2 you would enter 1,2 in the Valid Work Types field.
Use the Resources button to select Resources that the Vehicle requires while moving. This can represent a driver or can be used to control the availability of Vehicle by work shift or other logic.
Standard Routes: This button enters the dialog that can be used to override Simul8’s automatic route finding. For example in a real system, Vehicles might travel around a warehouse in a clockwise direction, so this button allows you to specify the paths that are taken.
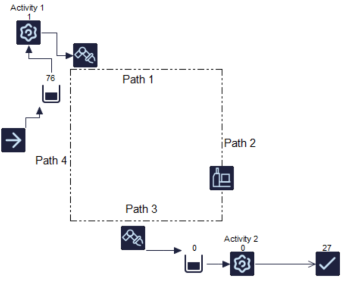
In this simulation the shortest route from Loader 1 to Loader 2 is down Path 4 and along Path 3. In the real system Vehicles are routed around the square in a clockwise direction. So the desired route from Loader 1 to Loader 2 is along path 1 first, then down 2 and along 3.
Click the Standard Routes button in the Vehicle Class dialog and select the start and finish Loaders.
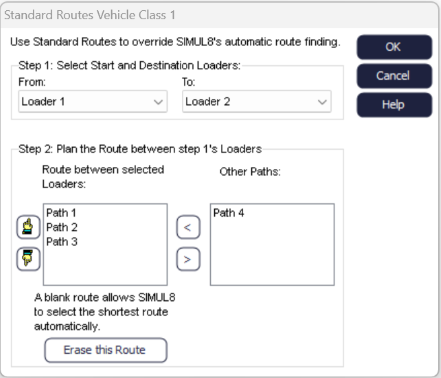
Use the buttons to change the route sequence. This tells Simul8 to take Path 1, Path 2, Path 3 from Loader 1 to Loader 2. Simul8 will still use its own automatic route finding for other routes unless overridden by this dialog.