Calendars
 Calendars can be found on the Data and Rules tab, or through the Calendars button in the Clock Properties dialog, and enable you to:
- Set a start date of your simulation
- Control more complex patterns of working days, such as deciding specific time periods that an Activity doesn’t operate.
Calendars (with the exception of the main calendar – see below) can be applied to one or more Activities or Start Points. An Activity / Start Point can have one calendar applied to it.
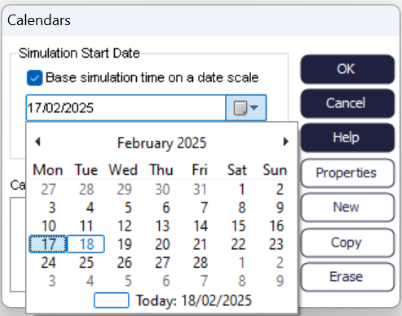
Simulation Start Date
By default (when not using a calendar), Simul8 runs from Monday of a generic week for a specified time (results collection period + warm up time). However, you can specify the Simulation Start Date by using Calendars. To select a start date, check the ‘Base simulation time on date scale’ box and select the required date from the date boxdate from the date box.
Main Calendar
The main calendar applies to the whole simulation and can be used in conjunction with the main simulation Clock to configure your exact simulation working time requirements. The main calendar will control the start date of the simulation and can be used on its own if you are setting up relatively simple, regular pattern which can be defined in the simulation clock.
Active Vs Blocked Calendars
If you are trying to set up a more complex working pattern (public holidays, ad-hoc closures of your process etc.), you will need to use custom calendars (on their own or in combination with the main calendar) to achieve this.
There are two key types of calendars, Active and Blocked.
Active:
Times that you add to an active calendar represent times ‘working times’. For example, if you were to add no time periods to an active schedule and then apply it to an Activity then that would be equivalent of saying that the Activity is never active / working.
Blocked:
A blocked calendar is simply the opposite of active. It presumes that all times are working times (as defined by the Simulation Clock) and any times you add to the calendar are treated as ‘blocked out’ times or ‘non-working’ times. For example, if you were to setup a blocked recurring event for Friday afternoons and apply it to an Activity, this would be equivalent of saying that the Activity does not work on Friday afternoons.
Create and Modify a Calendar
Creating, deleting, copying and editing calendars can all be done through the Calendars dialog using the New, Erase, Copy and Properties buttons respectively.
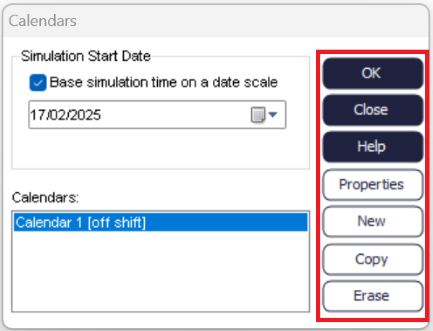
The 'on shift' and 'off shift' text beside the Calendar relates to the Calendars current state. For example if Calendar 2 contains a single recurring event (see below) that works 9-5 every Monday, and the current simulation time is Monday 3pm then the text in the square brackets would report ‘on shift’, however if the current Simulation Time was 3pm on a Wednesday (or any other day than Monday) then the calendar would be ‘off shift’.
After Clicking ‘New’ to create a new Calendar you will be presented with the ‘Calendar’ dialog, from this dialog you can do various things:
- Set the Calendar to be the Main Calendar (by using the ‘Main Calendar’ checkbox)
- Set the Calendar to be an Active or Blocked calendar (by using the Active/Blocked radio buttons)
- Apply the calendar to Activities and Start Points (by using the Check boxes in the central list box). Note: Activities and Start Points that already have a calendar applied to them will appear and be disabled.
Single Calendar Events
Single calendar events allow you to specify a single block out or active time (depending on your calendar setting). Simply specify a start date and time and an end date and time, for example, you may wish to block out a bank holiday date, let’s say Christmas Day. If you had a 9-5 working day your entry would look like this:
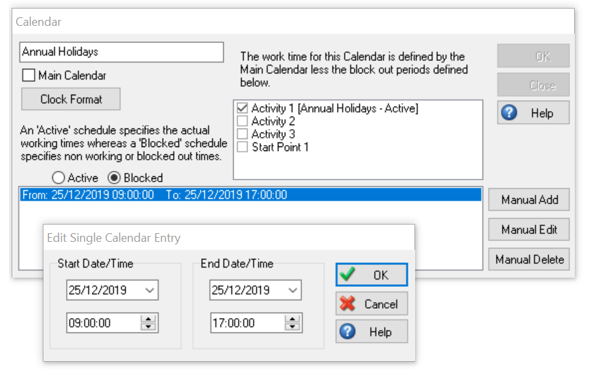
The above setting would let all simulation run on the annual holidays with the exception of Activity 1, which would not work on that day.
You can add multiple entries to any Calendar.
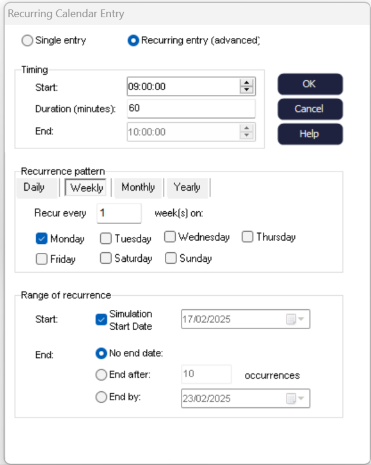
Recurring Calendar Events:
Recurring calendar events provide a quick way of setting up calendar entries, where the events would occur in regular intervals (i.e. daily/weekly/etc.). Effectively a recurring calendar event automatically creates multiple single entries for you.
To set up a Recurring Event, you need to define:
Timing:
- Start: The starting time of the recurring event
- Duration: The length of the event in Simulation Time units
- End: The ending time of the recurring event. Note: This is a non-editable box and will is automatically updated when the duration time is changed.
Recurrence pattern:
- Here you can choose what the type of recurrence you require: Daily, Weekly, Monthly or Yearly. For each recurrence type you can specify what days or dates the event should occur (e.g. every 2nd Monday of each month, every 15th day of every second month, every Monday and Wednesday of each week etc.
Range of recurrence:
- Start: Simulation start date: checkbox: Having this checked will use the Simulation Start Date to trigger the Recurring event.
- If you uncheck the Simulation start date checkbox you are free to select your own starting date from the date dropdown to the right (for example, only start the recurring event after 6 months, etc.)
- End:
- No end date: If this radio option is checked it is effectively equivalent of saying the event will occur from the given start date until the end of the simulation.
- End After: If the radio option is selected then you are free to specify the number of occurrences that the event should occur for.
- End by: When this radio option is checked you are free to select a date
For example, the below recurring dialog shows a recurring event that would occur for the full day (9-5) for every day except Wednesdays, Saturdays and Sundays. If this entry belonged to an active schedule that was applied to a single Activity then this would be equivalent of saying that the Activity works every week day except for Wednesdays (and it doesn’t work weekends).
As many single and recurring events as you wish can be added to a calendar, this allows complex powerful and flexible calendars to be built and applied in a short time frame.
Visual Logic Commands
For further information about these and other Visual Logic Commands, see the Visual Logic section.
Please note: Calendar Event continues until it is completed (advanced single event example)
If your clock is a 9-5 day (8 hours = 480 minutes) per day, and you set up an event to happen at 9 am on Monday morning, and you set the event duration to 960 minutes. Because 960 minutes is more working time than in a day (480 minutes more), this extra time rolls over to the beginning of the next working day. So, in effect the event described above is actually working a full day Monday and Tuesday, or equivalent of having two 480 minute duration events for Monday and Tuesday both starting at 9 am.