Simul8 Course Materials
Thanks for attending our course at Imperial College. We hope you enjoyed it and learned a lot!

Accessing Simul8
Please contact customerservice@minitab.co.uk to request access to Simul8.
Accessing our trial will allow you to build simulations of any healthcare process. To get up and running, check out our Getting Started video series below for some useful hints and tips.
Once you have access to your Simul8 trial you can gain limited access to the Sepsis simulation described in the Lecture as well as the Emergency Department example. Download the Sepsis Model here.
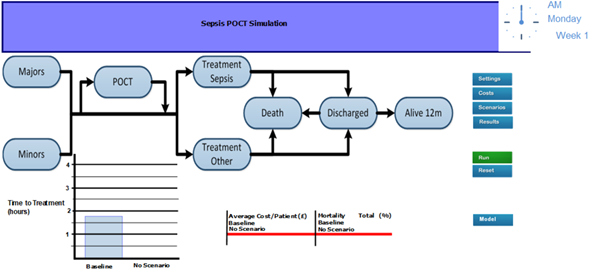
Sepsis simulation
The Sepsis simulation assesses the impact of introducing a medical device which gives early and accurate Sepsis diagnosis, meaning early intervention can occur (as explained in the lecture). The green run button can be used to run two different scenarios through the simulation, one where all patients are tested and another without the use of testing.
In the full version of this simulation, many different scenarios can be tested to be able to accurately assess the impact of introducing the medical device.
Model 2
With the Simul8 trial license you can also look through example simulations, one of these is the Emergency Department Example where you can run many different scenarios to see the impact on results, interacting with all onscreen buttons. This can be accessed through going to File > Examples.
Getting started videos
Introduction to Simul8 3 mins
Let's get to know Simul8! By taking your first steps to build an example simulation of a bank, you'll learn how to:
- Start a new simulation and access your saved simulations
- Access key features from the ribbon area
- Add and connect Simul8's building blocks
- Change the simulation clock properties to match your process
Arrivals and Activity Timings 3 mins
Let's add more detail to our bank simulation to reflect the real-life process. In this video, you'll learn how to:
- Set arrival times for Work Items entering your simulation using the Start Point Schedule
- Add timings to the different activities or tasks in your process
Applying Routing Options 2 mins
Let's apply some rules to route our customers to the various services in our bank. In this video, you'll learn how to:
- Set rules around how Work Items enter the simulation
- Use the Routing In and Routing Out features to direct Work Items to the different Activities in your simulation
Adding Resources 3 mins
We now need to add staff to make our bank services function like the real-life process. In this video, you'll learn how to:
- Add and define the number of Resources in your simulation
- Set the availability of Resources using the Shift Dependent and Resource Schedule features
Getting Results 3 mins
With our bank process set up, we can now collect and analyze our results! In this video, you'll learn how to:
- Access and collate results with the Results Manager
- Use the Trials feature to get average results from multiple simulation runs
- Add onscreen charts and tables to view results as the simulation runs